
Seven Cricut Projects to Organize Your Office
Use Your Cricut to Help Tidy Your Home Office or Workspace

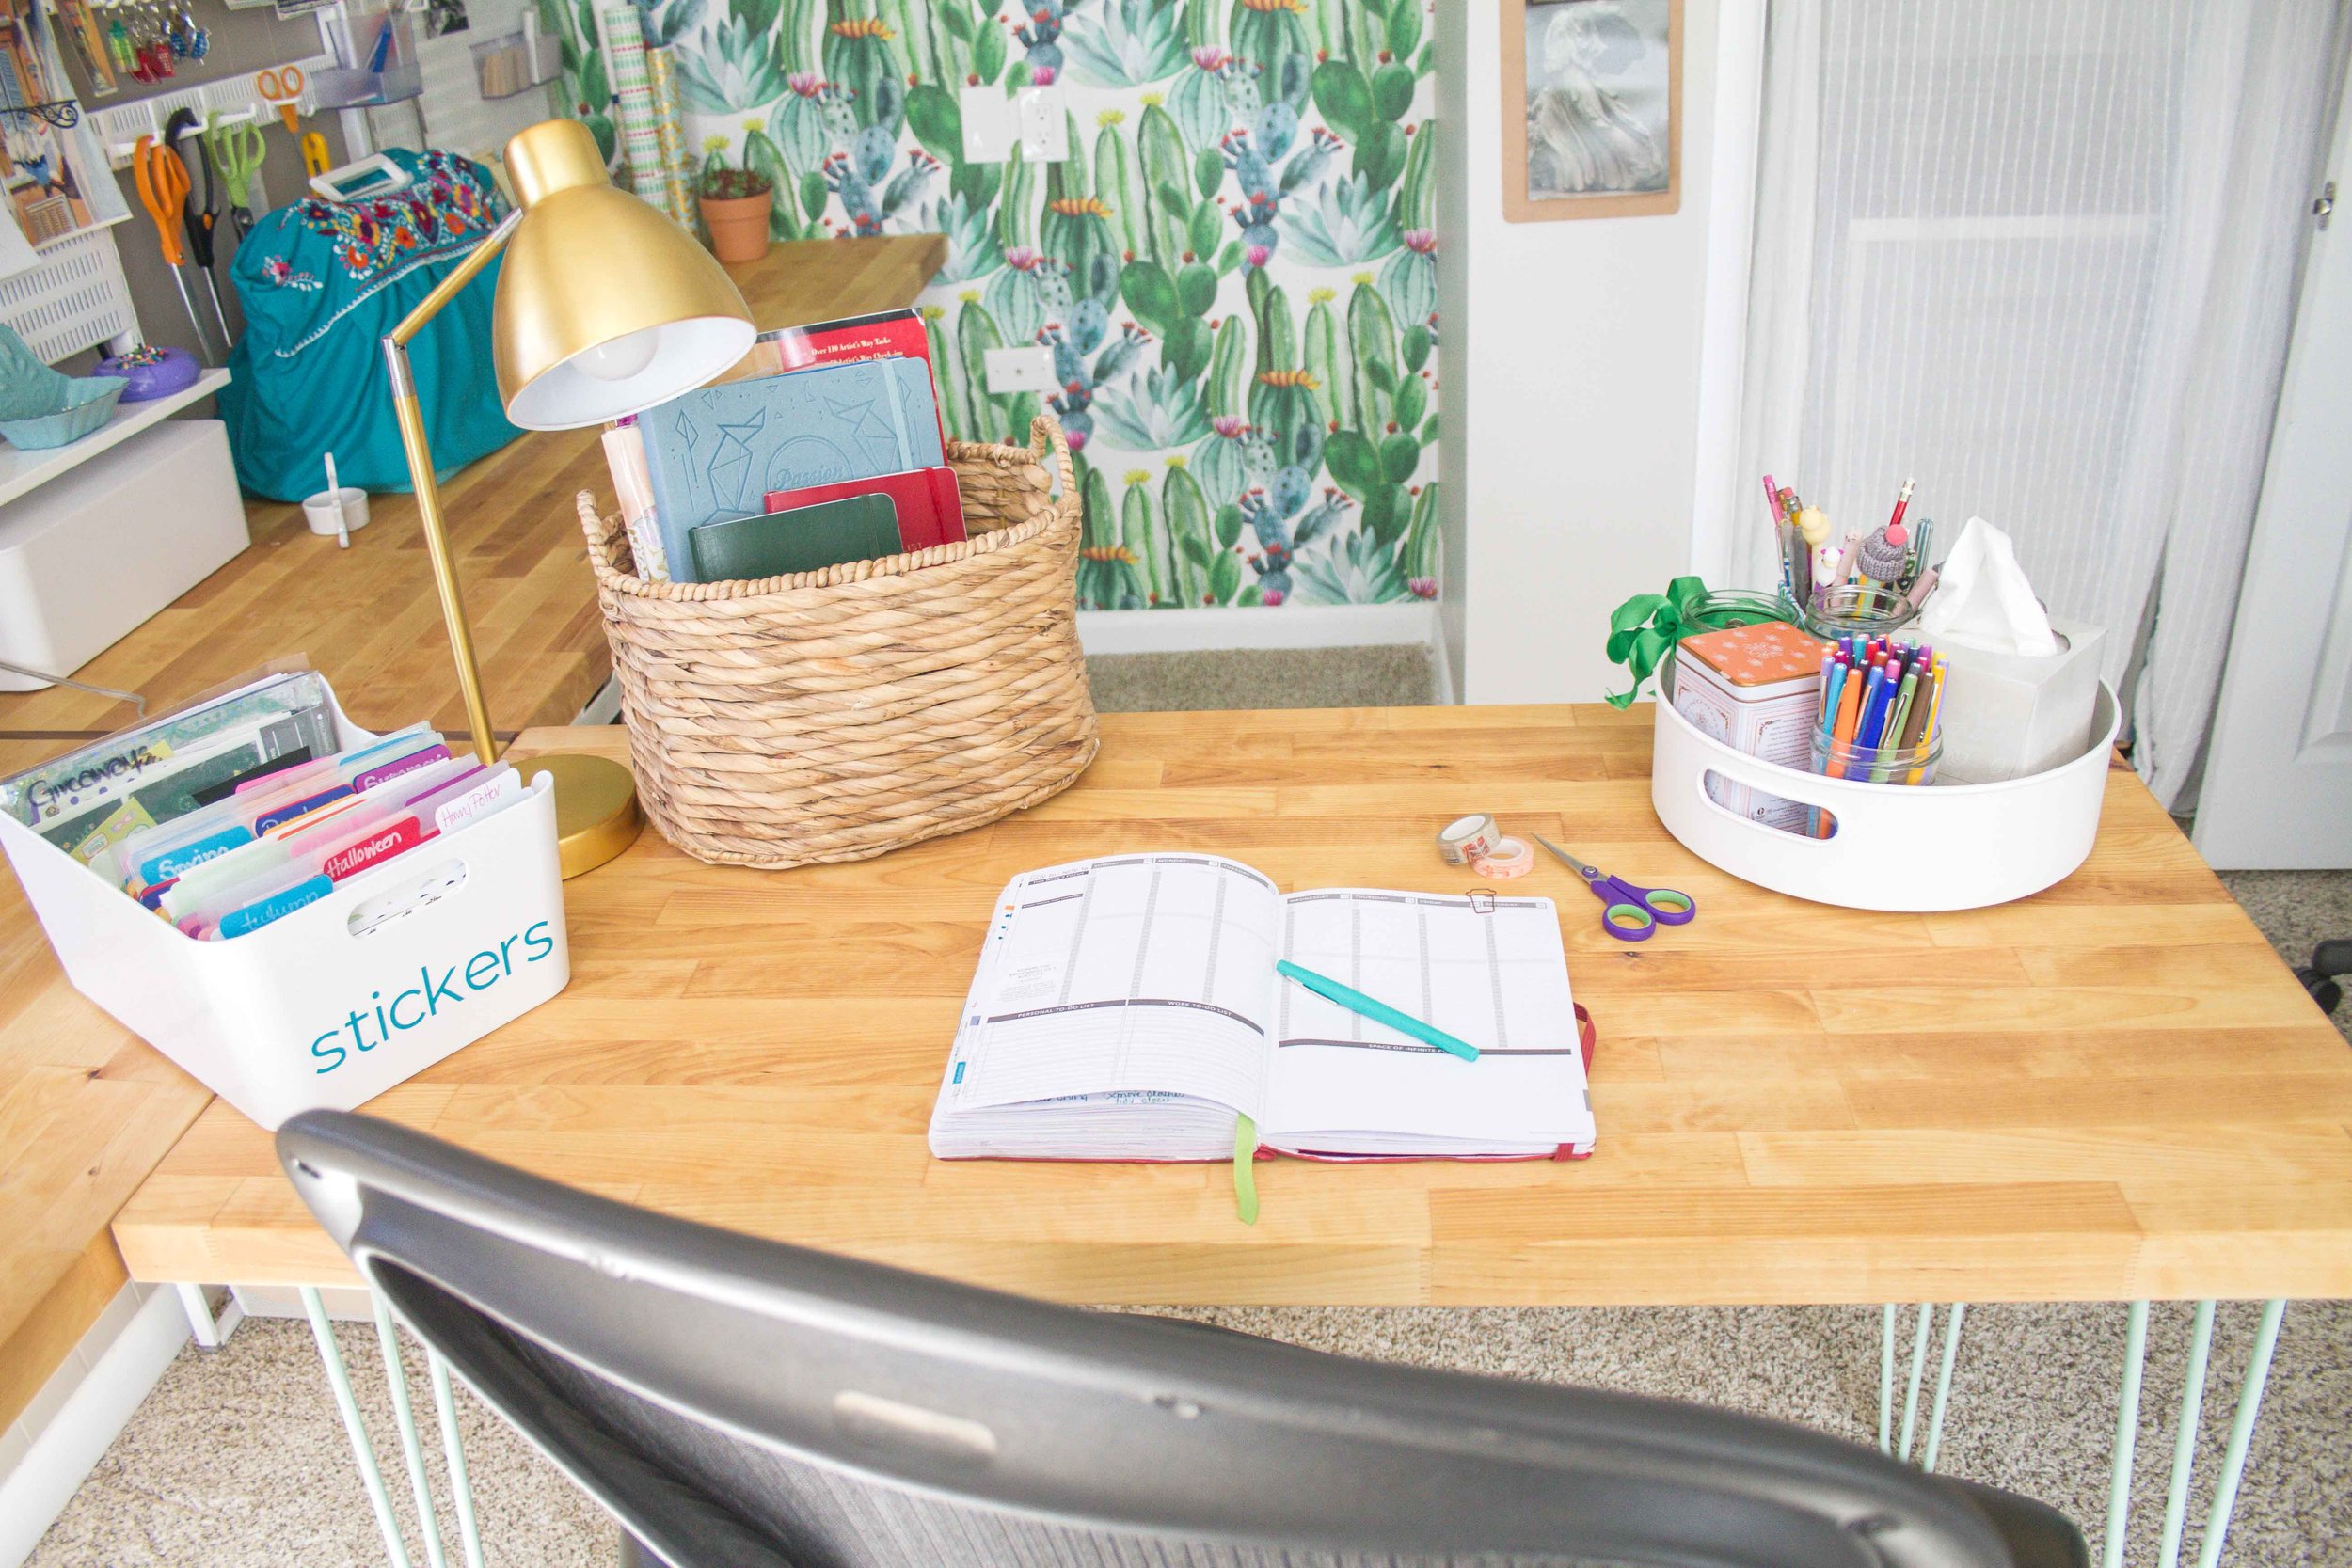
Home offices have become more important as people are working from home more consistently. When your home office is also a creative space, organization and storage is critical. It is hard to be creative or even productive in a messy office. But with a Cricut on hand, organization and storage solutions can be customized and created cheaply and simply. I have gathered seven organization ideas from my own office — all of which were made using my Cricut — that can make any office or home office more functional, organized, and beautiful, too.
I love my Cricut Maker, and I can recommend each of these solutions, because I use them in my own home office space. For the Fall 2019 One Room Challenge, I redid my own workroom -- a combination of office, sewing room, maker space, and library. It was a fabulous challenge, and now two years later I can safely say, this is a wonderful place to work and to be creative. I have employed each of these solutions in my own space, and I hope they are helpful as you set up or reorganize your own workspace, too.
Disclosure: This post is sponsored by Cricut, but all ideas and opinions are my own. AKN

Materials
Cricut Maker or Cricut Maker 3 : I have both and love them! See my note below about machines.
Cricut BrightPad Go: this is a new tool for me, and it makes weeding so much easier!
a printer: I have the Canon TS9521C (inkjet)
other materials as noted with each individual project below
A Note about Cricut Machines: these projects could absolutely be done on other Cricut machines. I happen to have the Maker and the Maker 3, but I know many of you out there have hardworking Joy and Explore machines, too. Use what you have! The principles are the same.
Whether you are creating your own graphics or using the thousands of graphics in the Cricut Design Space, simple, colorful artwork makes for the best stickers and labels.
Here are some of the ways I have used my Cricut to help organize my office.

My Maker 3 is so fast! It is an incredible tool in my office.

A coffee tin, a cookie tin, and a salsa jar now serve as cute containers in my office for tools and supplies.
Upcycle Containers
for Storage
I am a big fan of upcycling. It saves money and resources, and it is better for the planet. When I redid my office, I only ended up buying three new bins -- everything else was upcycled or repurposed. But some of those containers weren’t very attractive. Enter the Cricut! I used my Cricut to cut sheets of vinyl or paper to the exact dimensions needed. Then I recovered the containers. Naturally, I also labeled them! This makes color-coordinated and attractive containers for free!
Tip: This technique is particularly great when covering something that is oddly shaped or curved. The Cricut cuts perfect lines, so it’s easy to get the right fit each time.
The graphics for this project are available in the Cricut Design Space. The link is below. Enjoy!


Labels, Labels, & More Labels
I sometimes joke that my Cricut is a glorified label maker. It’s true! I love a good label, and using vinyl to make clear, concise labels for bins, boxes, and other containers, has made my office so much tidier. I particularly love my white bins which are labeled in shades of blue and green. It’s easy to find the right bin for a project, but the contents are also hidden away which makes what could be visually confusing, calm and soothing.
No matter how you are organizing your office space, label your containers. I used Cricut vinyl. I chose one font -- something clean and crisp. Because my bins were in three different sizes, I created three different templates: large, medium, and small. Then I created the labels sized appropriately for each bin.
I also labeled several empty bins with WIP -- Work In Progress. These bins are for projects that I’m working on but need a place to keep until they are done. They are so handy! When the project is done, the empty bin is stashed away until a new project arises.
Tip: labeling is actually the last thing I did when making over this space! I sorted items into bins and figured out where everything would live. Then I lived with it for a few weeks. Once I was sure the bin configuration was what I needed, I labeled each bin. That way I didn’t waste vinyl and time having to relabel when I changed my mind.
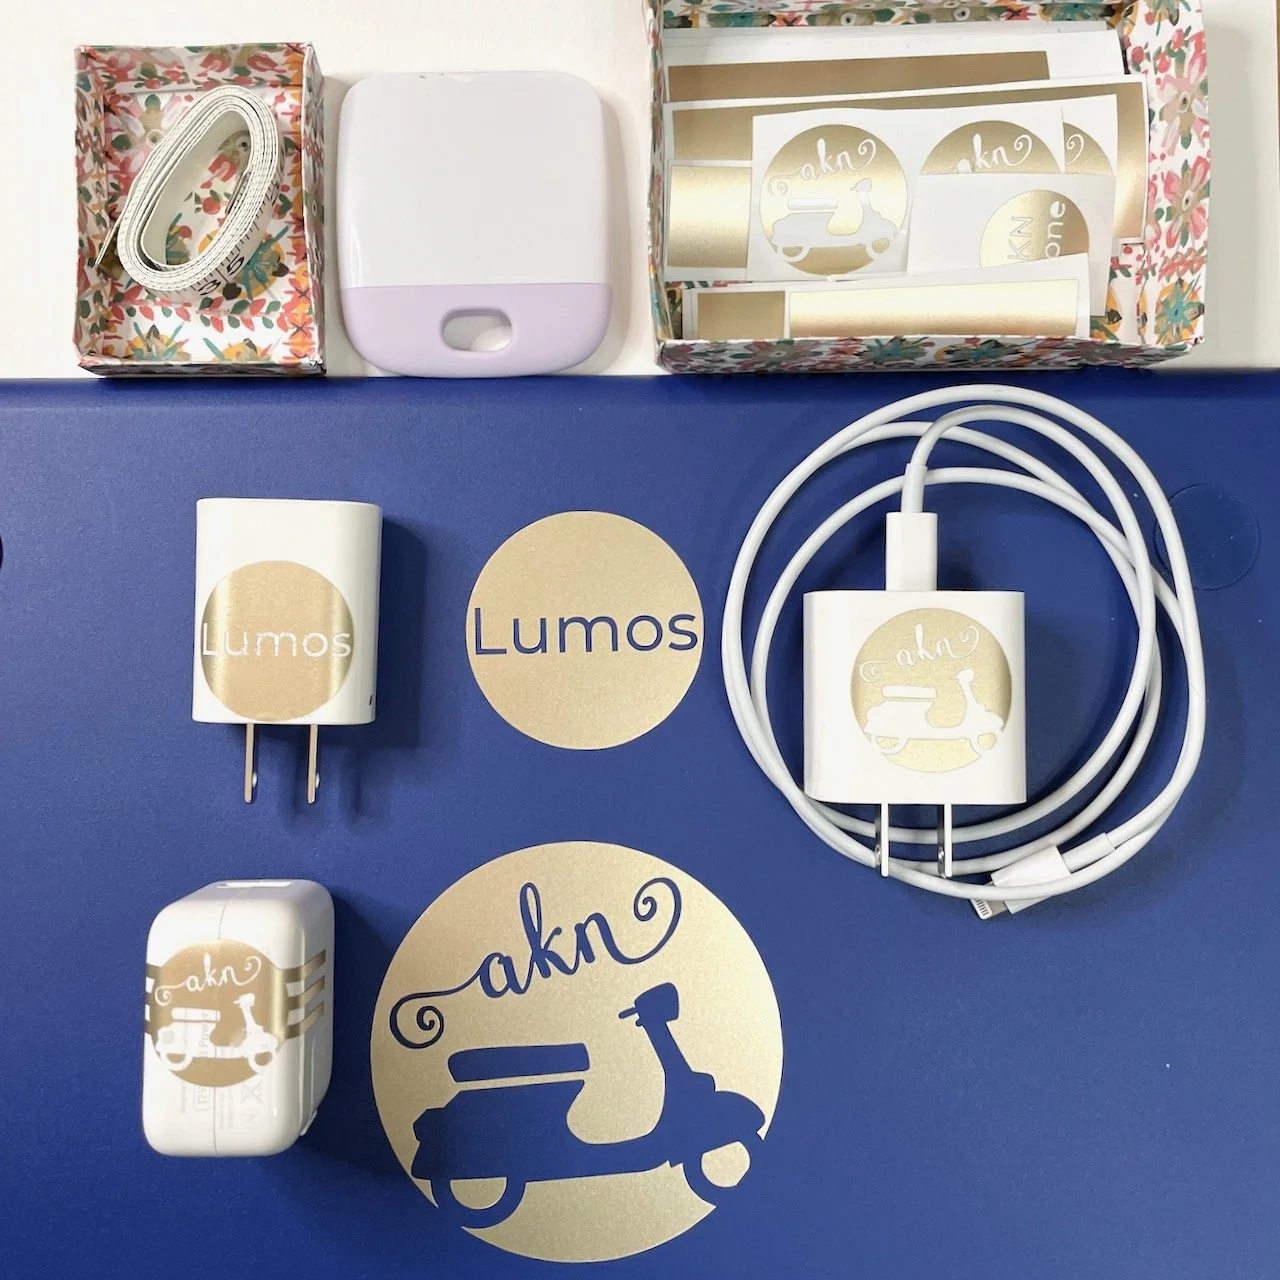
I named my Cricut BrightPad Go Lumos. Both the BrightPad and the plug have labels so they are easy to pair up.
Label Your Plugs
So, this is technically labeling, but it is so handy, it deserves its own entry. Use your Cricut to label your plugs. If you are in a shared office space, put your name or your initials on your device plugs so there is no question about ownership. If you have multiple items plugged into a powerstrip, label each plug so you know what is plugged in and where.
Cord management is super important. When you make everything look tidy, it makes the whole room better. And there are lots of cord management solutions out there, but it all starts with labeling your plugs. That is the most important -- and easiest -- step.
I’ve created a template to get you started. It’s in the Cricut Design Space (link below).
Tip: for these labels I used Cricut’s Smart Vinyl (permanent vinyl) in Champagne.


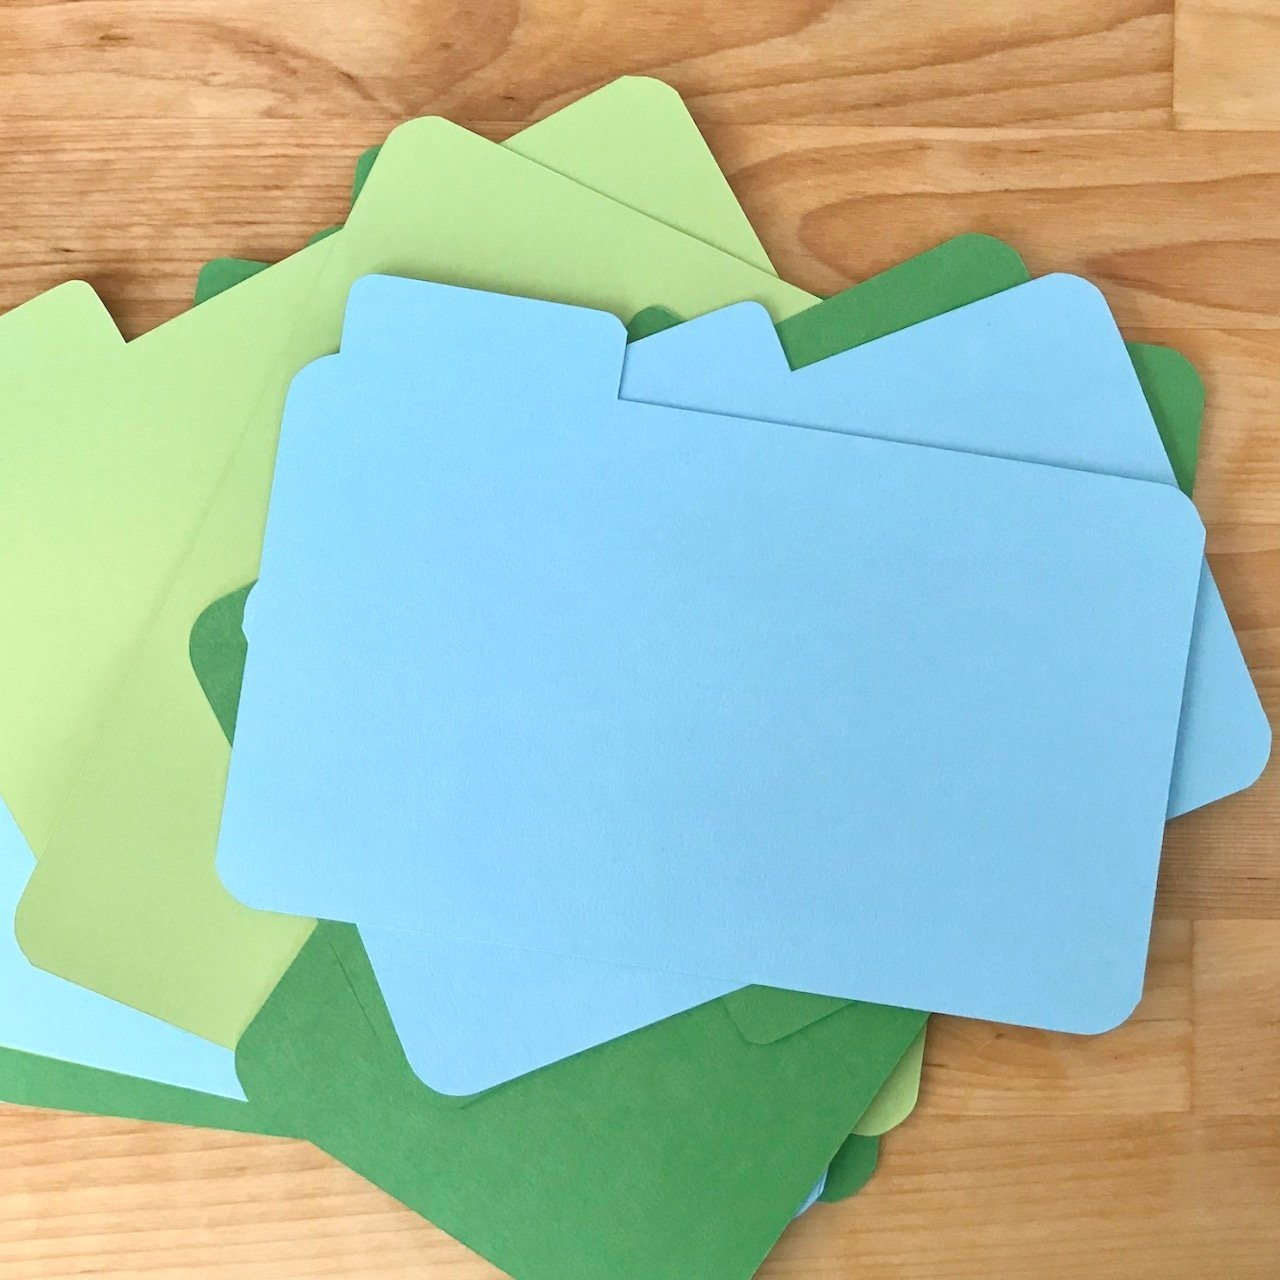
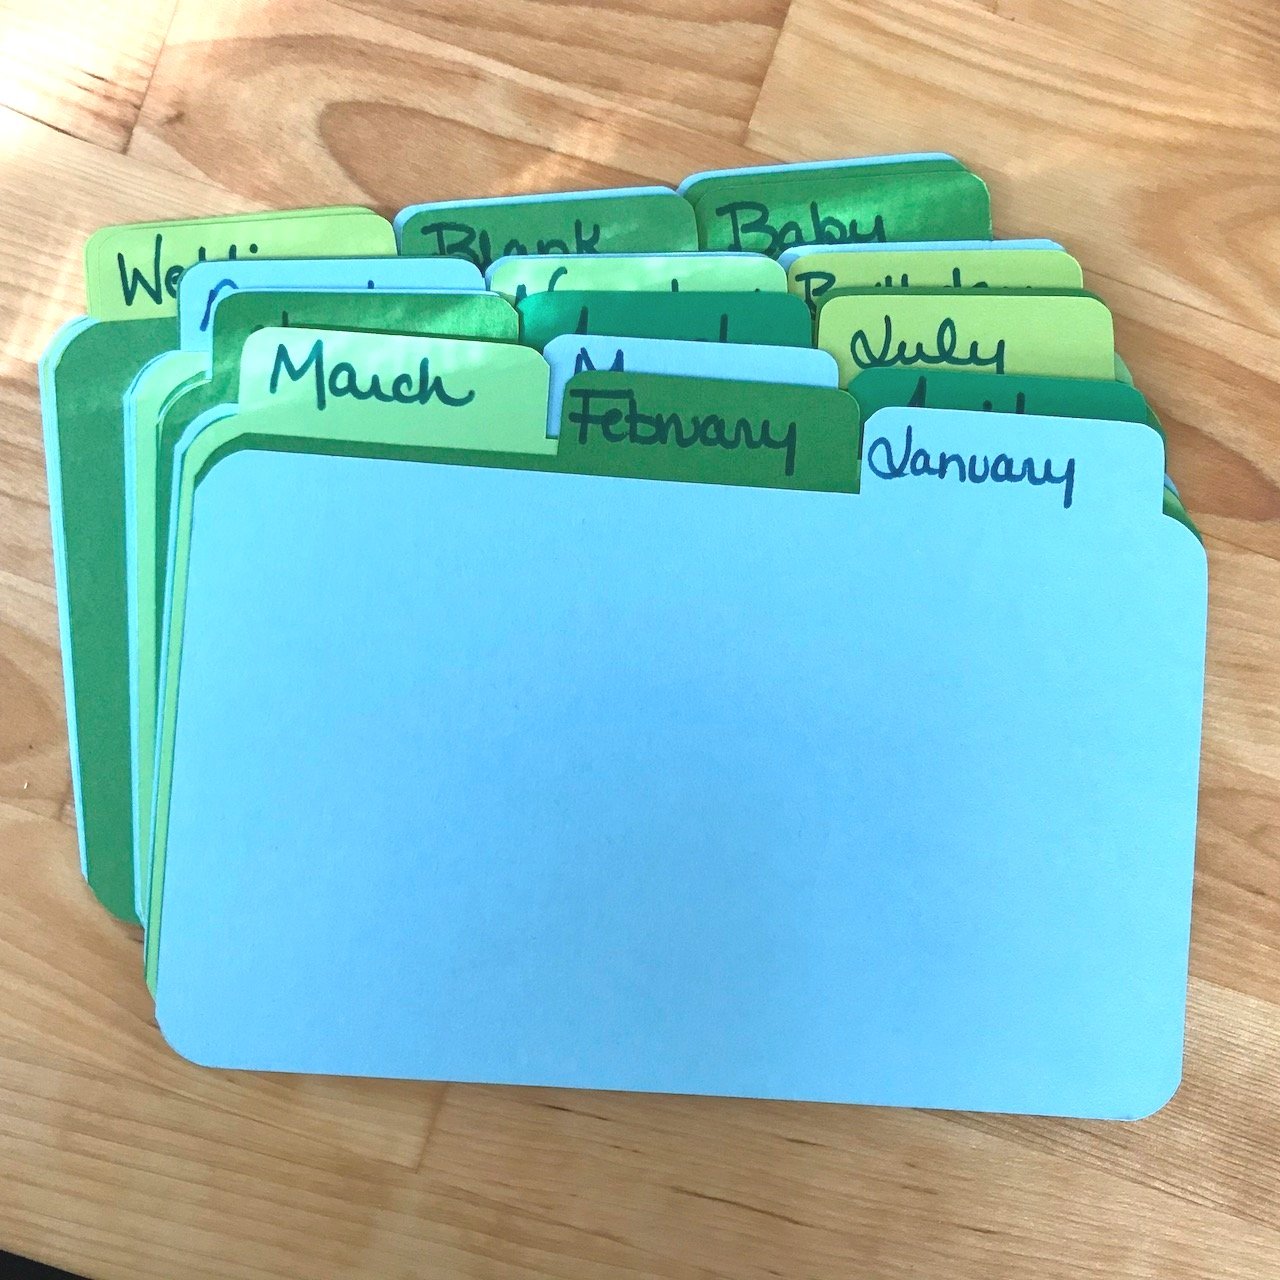
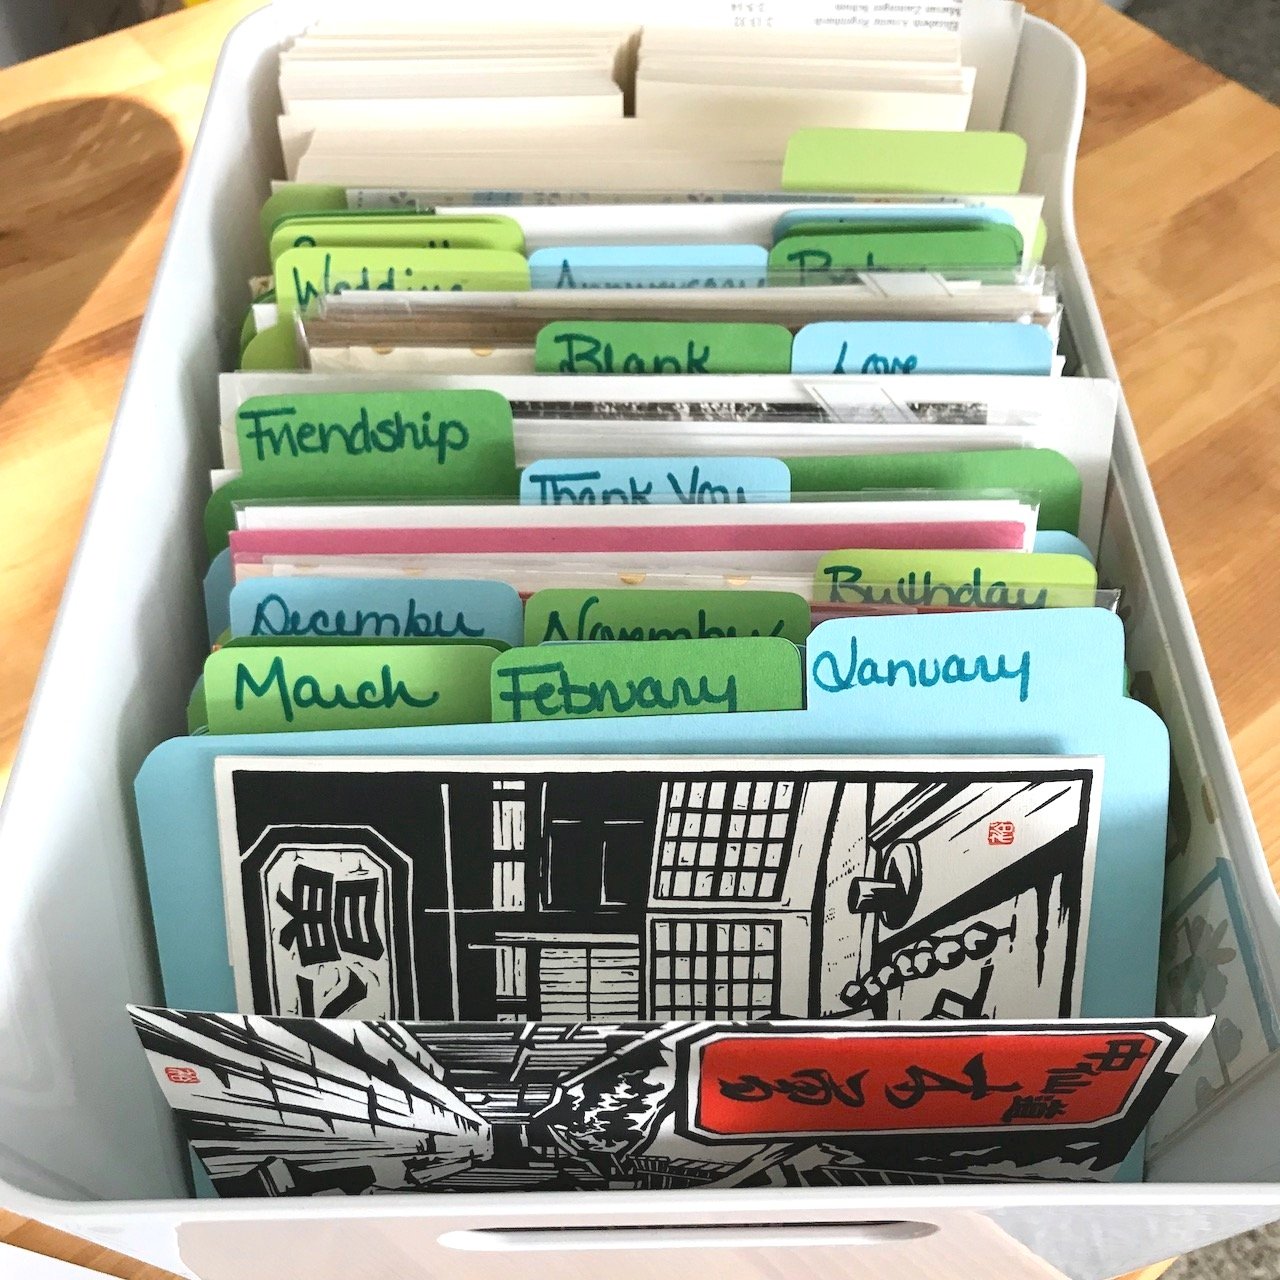
Make Divided Bins
Bins are great, but it’s even better to organize what’s inside. For several of my bins, I’ve created dividers -- a quick cut project on my Cricut. These little dividers -- cut from cardstock -- turn a bin into a tidy filing cabinet. I have several bins with dividers where I organize greeting cards, sticker inventory, and ephemera for journaling projects. This is a great way to organize your inventory if you make and sell smaller items like stickers or greeting cards. You could also organize samples, tidy up photographs, alphabetize, sort receipts, or keep smaller pieces of artwork at your fingertips.
Any container with straight sides can become a small filing cabinet using this kind of simple divider. Just resize the template to suit your needs. And cut the dividers from carstock in the color of your choice.
The SVG files for this project as well as step-by-step instructions are available at the link below:

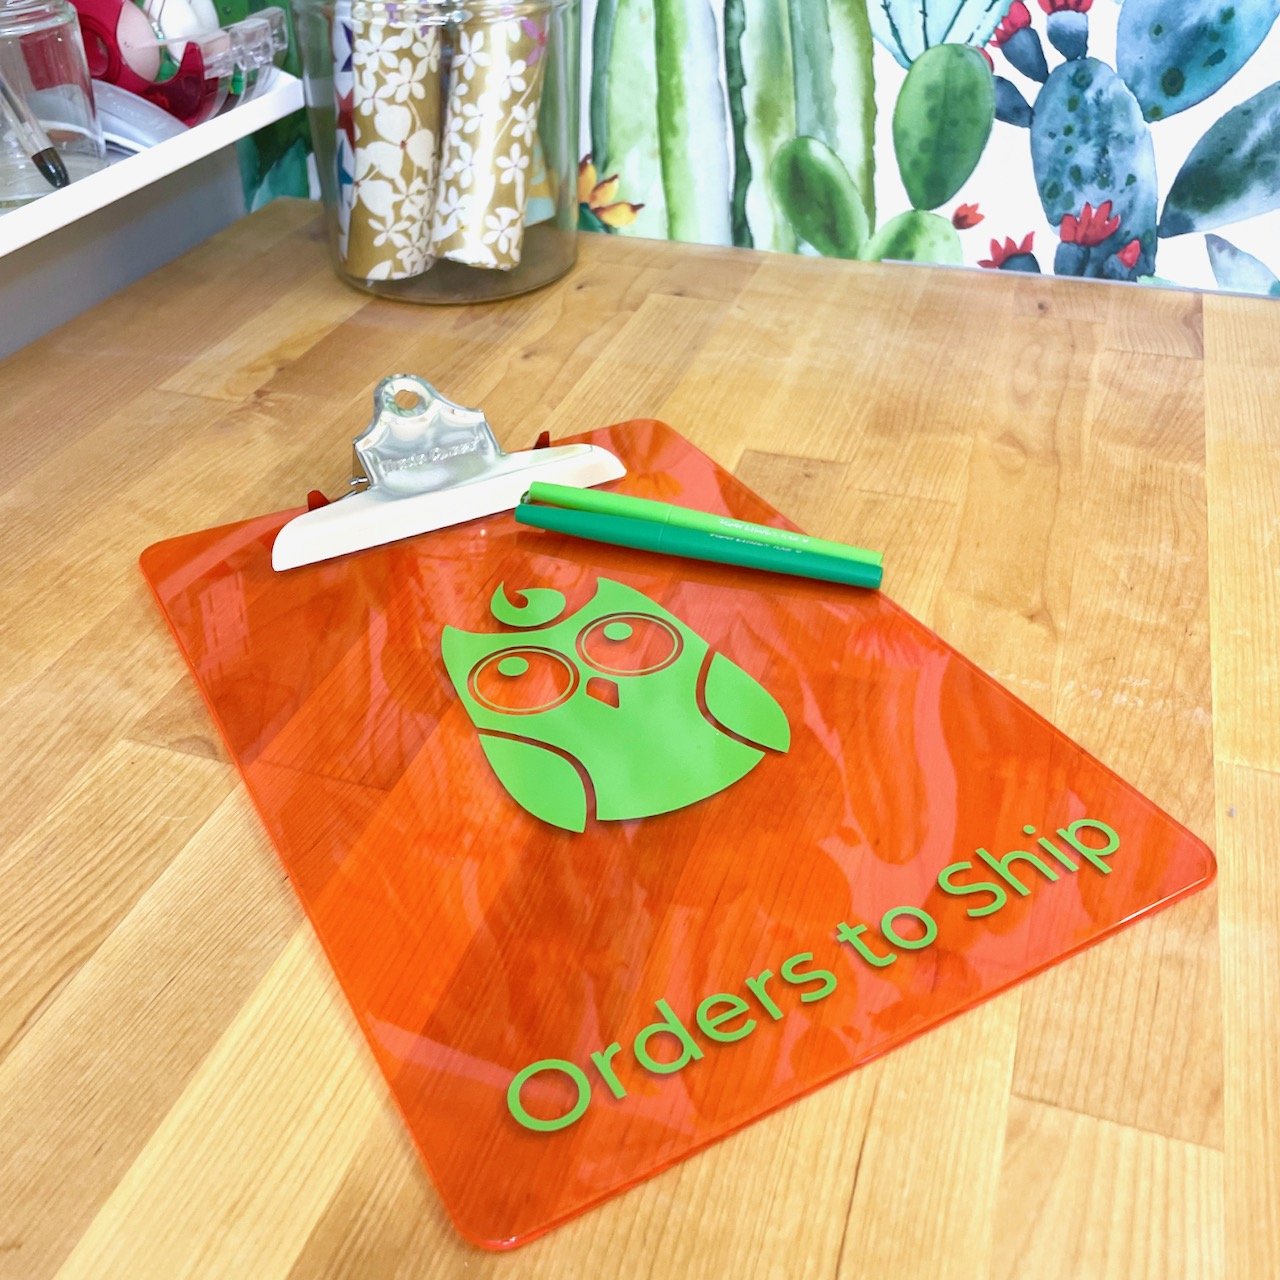
Clipboards are a great way to organize shipping slips and inventory lists. Hang them on the wall for easy organization.
Customized Clipboards
Clipboards are a fabulous way to organize current projects that involve some paperwork or pages of notes. You can hang clipboards on a wall or file them away in a basket or a bin. But when you grab one clipboard, you have a portable representation of a single project. Clipboards can also be very inexpensive, and they are fun to decorate using vinyl and your Cricut.
Customize one for each member of your team. Create one for tracking current projects or sales goals or to keep printed reports handy. Give them as gifts to clients with your branding. Use them to organize tasks or client projects or order fulfillment at the beginning of each day or each week.

Tip: for these clipboards I used Cricut’s Premium Vinyl (permanent) in Lime. It comes in more than 40 different colors.
The clipboards I often use, are available at the link below.


Organize Inventory & Supplies
Sometimes keeping smaller inventory items or supplies tidy can be the biggest challenge. Rather than buying containers, cut some small, foldable boxes from cardstock to tidy up your smallest items.
One of my favorite lessons from Marie Kondo’s Lifechanging Magic of Tidying Up is to use open-topped boxes to divide drawers and larger spaces into just-right areas. I save boxes scrupulously, but small boxes don’t come along all that often. So I created this template! The boxes are easy to make, inexpensive, and can be customized according to your needs. Line a shallow drawer with these boxes to hold paperclips, staples, erasers, and other smaller office goods. You can tidy an entire desk drawer with a combination of sizes.
Our sticker shop, Owl and Ember, sells both sticker sheets in several sizes as well as larger vinyl stickers. To keep them tidy, we use a combination of these little boxes and the divided bins, depending on the sticker size.
The printable paper I designed for these bins is available in my Library, and the box patterns are available in the Cricut Design Space.


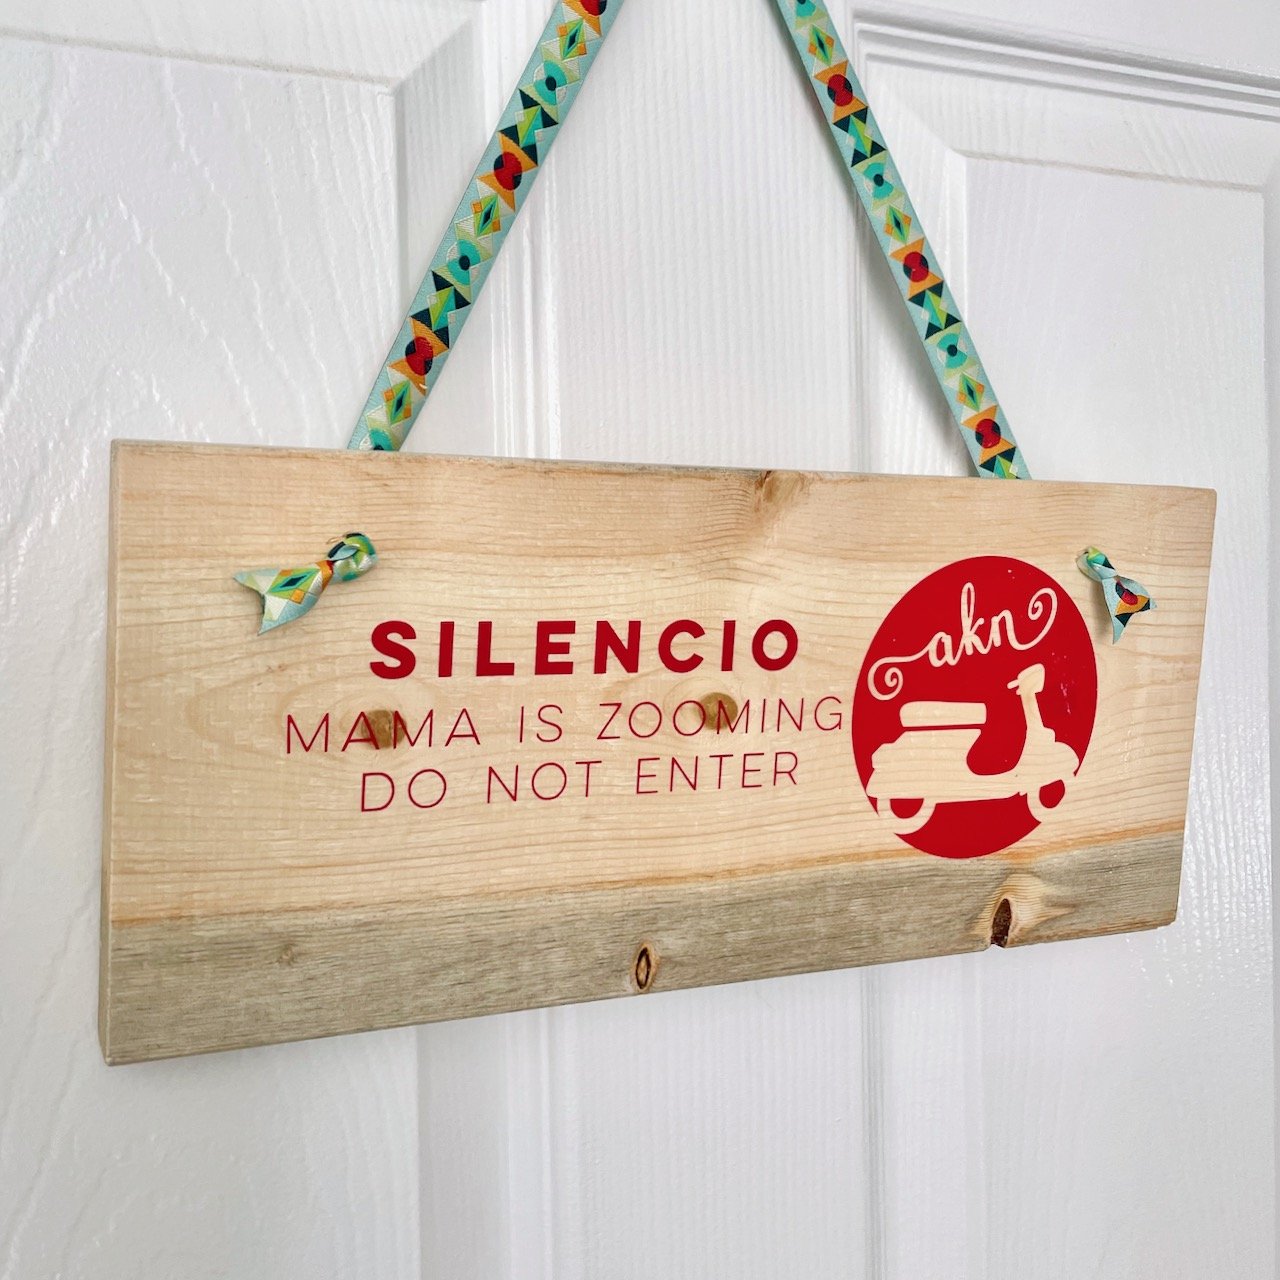
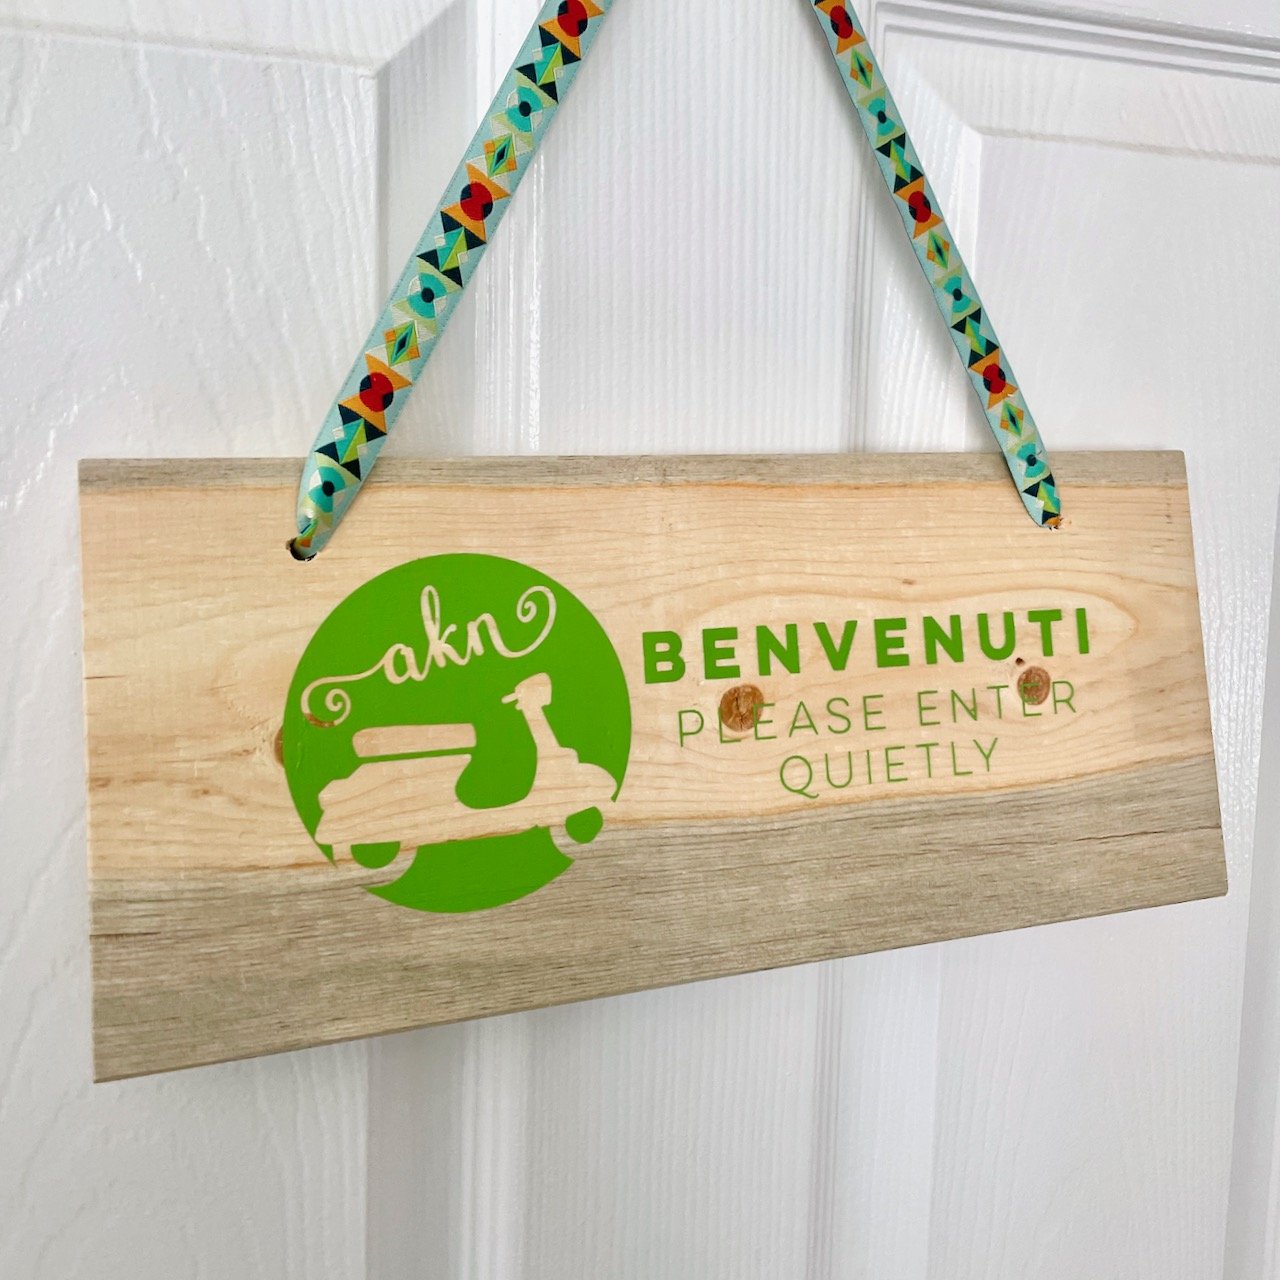
Flippable Door Sign
How many times have I been interrupted while on a Zoom call in the last two years? More times than I can count.
But then I made this magic flippable sign.
One side indicates that it is OK to interrupt -- that’s on most of the time. But when I am in an important meeting, the do not disturb sign goes up. This is an important part of setting boundaries for working at home, and my family is great about abiding by them, too. It’s a really simple project using vinyl cut on your Cricut and a hot iron or an Easy Press.
I have a full tutorial for sign making at the link below.

No matter what your business is -- at home or at the office -- a Cricut is an indispensable tool in organizing your workspace. I hope these simple and inexpensive solutions help you make your office a place for creative and productive work.
Pin it!

Setting up a home office or a new office space can be a challenge. Here are 7 Cricut projects which will help you organize your desk on a budget. With simple DIY projects and ideas, these easy Cricut projects will help you tidy and stay organized while you work. Ideas for organizing inventory, tracking orders, upcycling containers, and making labels -- all with your Cricut Maker. #ad #cricutmade